Managing domain reputation

Managing domain reputation

This article describes best practices for managing your domain reputation to ensure that your email is considered to be trustworthy.

Prerequisites

  • Applies to: Administrator
  • Difficulty: Easy
  • Tools required: DNS host admin access

Manage domain reputation

Domain reputation, in terms of email, is a measure of how trustworthy others believe your domain’s email to be. Every email recipient maintains their own specific measure of reputation, but there are many industry-accepted recommendations that domain owners can follow to build a solid reputation. As more and more email providers are strengthening their rules for what is considered untrustworthy, failure to follow these recommendations might lead to your mail being considered spam, rate limited, or rejected.

The three pillars of any domain reputation strategy are Sender Policy Framework (SPF), Domain Keys Identified Mail (DKIM), and Domain-based Message Authentication, Reporting, and Conformance (DMARC). These features are designed to provide two basic things:

A method of verifying that the email comes from a legitimate source specified by the domain owner.

A way for you, as the domain owner, to tell email providers what to do with messages that do not meet those legitimacy requirements.

Individually, these three pillars are limited in how much they can do, but together they form a fairly clear process for identifying legitimate email from your domain. Providing these clear indicators is fundamental to establishing a good domain reputation. Rackspace recommends the following 1, 2, 3 approach to establish domain reputation:

Create an SPF record. SPF is a DNS record that tells the world where your email is authorized to come from. This record typically contains entries for your email hosting provider and any email services you use, such as ticketing systems, Customer Relationship Management systems (CRMs), and bulk sending services.

Enable DKIM. DKIM applies an encrypted signature that is specific to your domain on every message sent from your domain. Most email service providers offer DKIM as a feature of their service. Typically, each sending service listed in your SPF record has its own DKIM signature that it adds to your email.

Create a DMARC policy. DMARC is built on SPF and DKIM. It combines the validation results from both SPF and DKIM, and adds a “sender alignment check” to protect against many forms of spoofing. The policy part of DMARC is what allows you, as the domain owner, to specify what to do with email that fails these checks. It also includes a reporting aspect that is critical to long-term management of your domain’s reputation. This reporting gives you visibility into the email being sent as your domain: where it’s coming from (SPF), whether or not it’s properly signed (DKIM), and whether or not it is passing your DMARC policy.\

Because many companies have multiple domains and use many services that require email, managing reputation across several domains can become complicated. Here are some general recommendations for managing your business email needs across many domains. The following sections offer some general recommendations for managing your business email needs accross many domains.

Separate your email needs

You should always separate mail by purpose and class (marketing, sales, transactional, person-to-person, and so on) by using specific subdomains wherever possible. The following table shows different email purposes and their suggested domain naming conventions:


Ticket system emailsMarketing emailsNewsletter emails
support.mydomain.commarketing.mydomain.comnews.mydomain.com

In addition to separating email by purpose, the following recommendations help to properly manage your domain’s reputation:

  • Never share DKIM keys between services. Each source should have its own DKIM key. Most services offer this as a feature. If a subdomain has multiple sending sources, then it has multiple SPF includes and DKIM keys. This is perfectly normal.
  • Segregating emails enables you to lock down each mail stream, as well as isolate each mail stream from any issues the others might have. This is important when it comes to managing the sending reputation of your different email sources. When it comes to managing your domain’s (and subdomain’s) reputation, different classes of email have different considerations.
  • Configure SPF, DKIM, and DMARC for each subdomain.
  • Keep your sending sources segregated and manageable for both SPF and DKIM records.

Person-to-person corporate mail is special

For person-to-person corporate mail, consider the following best practices:

  • Reserve your primary domain for only person-to-person email (your employees).
  • Don’t use vanity addresses on your primary domain for automated systems, such as support@mydomain.com for your ticketing system.
  • Configure an umbrella DMARC policy on the root domain, and create subdomain-specific DMARC policies based on the specific requirements and class of mail it represents.

    For example, you might use p=quarantine on your primary domain (person-to-person email), but p=reject on your outbound-only transactional email (support tickets).

    Taking this step also ensures that the root domain catches all DMARC reporting that might be missed or misconfigured at the subdomain level, as well as catching any unauthorized subdomains attempting to spoof your brand.
 

Solve 500 Internal Server Error in WordPress

The 500 Internal Server Error is the most unhelpful and nondescript bane of web developers everywhere. It’s a catch-all error message that can literally mean anything. Sometimes, your WordPress site gives no error at all and just shows a blank page. How on earth are you supposed to figure out what’s wrong?

It happens to the best of us, but no need to panic. Here’s my own debug process, in order of likelihood and with solutions.

Plugins

If you’ve just installed a new plugin or if your site is showing 500 errors after a core WordPress upgrade, the most likely cause is an incompatible plugin. There are many reasons for a plugin being “broken”:

WordPress may have removed some core functions the plugin uses.
The plugin may have been coded for an old version of PHP, and not been updated.It could just be coded incorrectly, by referring to default database names rather than using prefixes, for example.

Identifying the plugin is easy if you’ve just installed one and the error has emerged, but how can you disable the plugin if it’s taken down the wp-admin area of your site too? You’ll need FTP access, is the short answer, though the web-based file manager from CPanel or Plesk will work fine too.

Solution:

All you need to do is rename the wp-content/plugins/ folder. Place a _ in front of the plugins folder, so it’s named _plugins, and you should now be able to login again to your WordPress admin area. By renaming the folder, you effectively de-activated every plugin – you should get a bunch of error messages from WordPress saying “X plugin was deactivated because the file Y.php can’t be found”. Don’t worry, you won’t have lost any settings – those are stored in the database, and any decent plugin should find them again upon re-activation.

Rename the folder back again, removing the _. Refresh the WordPress plugins and they’ll all be listed again, but in a deactivated state. You can now re-activate them one by one until you find the culprit; then do it all again, obviously leaving out the bad plugin this time.

It’s unfortunate when this happens, but chances are there’s a better plugin out there that is compatible. Find it.

Incompatible Theme

Disabling plugins didn’t help? It’s probably something in your theme, then. Just like plugins, you can force the active theme to break by simply renaming it. Go back to the WordPress admin area (if you can, of course – if you can’t, it’s probably nothing to do with your theme) and WordPress will alert you that it’s fallen back to the default theme. Check the site again. Of course, this doesn’t really help if you’re committed to a particular theme, so may want to re-enable it and head down to the section on Enabling PHP Debug; or just go and find a newer, compatible theme.

Bad .htaccess

If de-activating your plugins achieved nothing and it’s also not your theme, it’s possible that your .htaccess file became corrupted in some way. Usually when this happens you can still access the admin area of the site. The .htaccess file handles rewrite rules and cache settings, but sometimes you’ll edit this file directly to manually code in things like 301 redirects.


Solution:

Rename the .htaccess file in the root of your WordPress install folder to something like .htaccess_old. If you can’t actually see the file there, you need to enable viewing of hidden files – the exact method of doing that will vary according to your FTP client. The “.” at the start of the filename is a way of saying “hide this” in Linux and other UNIX-like systems.

Once you’ve renamed the current .htaccess, go back to WordPress admin area, then head over to Settings -> Permalinks and, without making any changes, hit save. This will automatically generate a new working version of the file, though any changes you made manually will be lost.

Enable PHP Debugging

We can enable a debug log from within WordPress config, which might give a clue as to the exact problem – but at this point you’re on your own. You’ll need to figure out how to fix it, which will require coding skills.

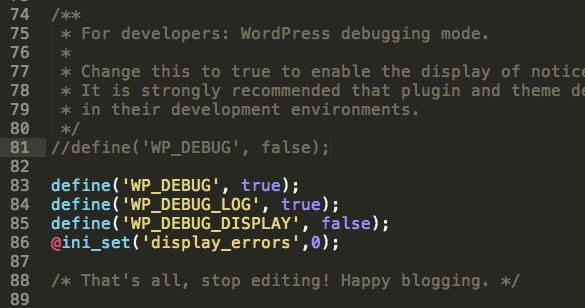
To enable the debug log, open up wp-config.php in the root of your WordPress install. Find the line that says:

define(‘WP_DEBUG’, false);

Comment it out using // at the start, then paste in the following:

define(‘WP_DEBUG’, true);
define(‘WP_DEBUG_LOG’, true);
define(‘WP_DEBUG_DISPLAY’, false);
@ini_set(‘display_errors’,0);

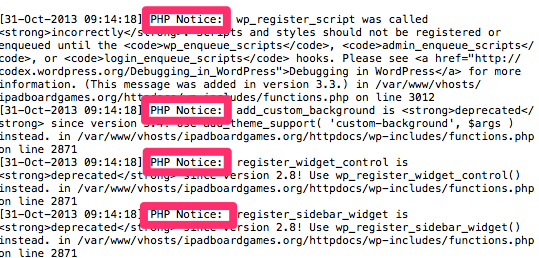
This will start outputting errors to a file in wp-content folder called error.log. If you refresh your FTP and see nothing after a minute or so, it’s possible it doesn’t have permission to create the file. Manually create a new error.log file and give it permission 666.

Be warned: this file will continue to grow larger until you remove those lines from your config. Don’t forget to uncomment the original line as well. Read the file in any text editor, and check for any critical PHP errors. In this example, I see a lot of PHP Notices about deprecated code, but these won’t actually break a site.

Server config

I recently had a case where roughly half of all page loads were coming up as 500, but with no set pattern and absolutely nothing helpful in the error logs. Activiting WordPress debug logs showed nothing obvious – lots of PHP notices and deprecations but nothing critical. Finally, I realised I had installed APC caching onto the server the weekend before, to use with W3 Total Cache. Uninstalling that completely eradicated the 500 errors.

My point: the 500 error could simply be a combination of server configs that present an incompatibility. This is unlikely if you’re using managed services, but with your own Virtual Private Server (why should you use a VPS instead of shared hosting?) you’re responsible for making sure everything works together, and this is harder than it sounds.